Introduction
Important properties evaluated in this study that may be affected by the combination of mills and materials while producing restorations include flexural strength, machinability (chipping), milling accuracy, and initial surface roughness.
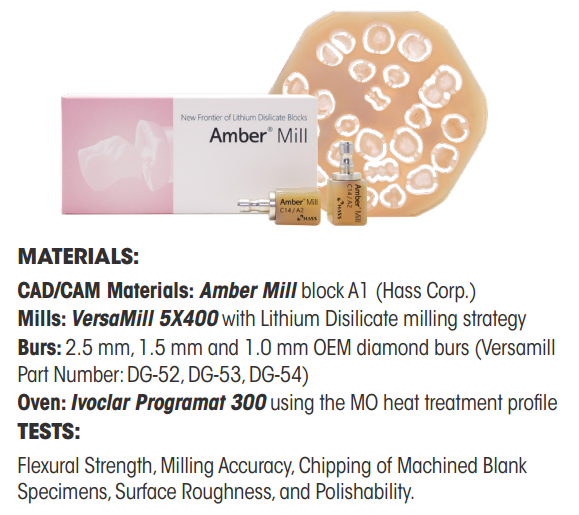
This study used a 5-axis mill, the VersaMill 5X400 with a lithium disilicate milling strategy to evaluate the machinability of a recently released lithium disilicate block, Amber Mill® (Hass Corp). Amber Mill has a unique feature that allows the material
to be very transparent before heat treatment, and the temperature of the heat treatment modulates the translucency from high translucency to opaque reducing the need for multiple blocks of different translucencies for any given shade.
Polishability and surface roughness
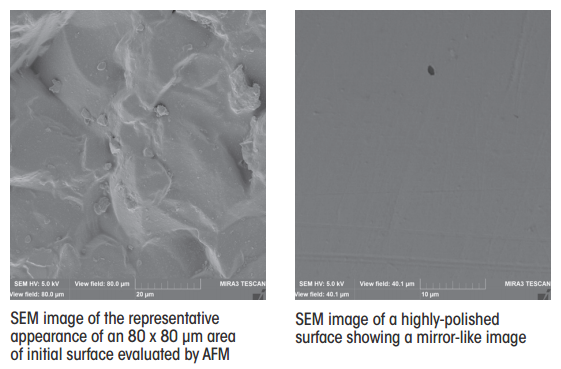
Flexural strength specimens were used to examine the initial surface condition of the materials after milling. The specimens were evaluated with a scanning electron microscope under various magnifications and a Bruker Dimension Icon Atomic Force Microscope for qualitative and quantitative evaluation of the surface topography. The initial gloss was measured with a Novo-Curve Glossmeter, with three measurements per specimen every 120° and the surface roughness with a Bruker Dimension Icon Atomic Force Microscope with an 80 x 80 µm area scanned to generate a 3D topographic map and calculate the average surface roughness (Ra).
The specimens were polished with a Luster Twist Polishers (Meisinger) for 20, 40 and 120 seconds and the change in gloss and roughness measured for a time dependent polishing measurement.

The total peak to trough height after milling was 10.4-11.4 mm. Adequate polishing with an Ra below 200 nm (or 0.2 µm) to minimize bacterial adhesion was achieved within 40 seconds of polishing.

Flexural Strength
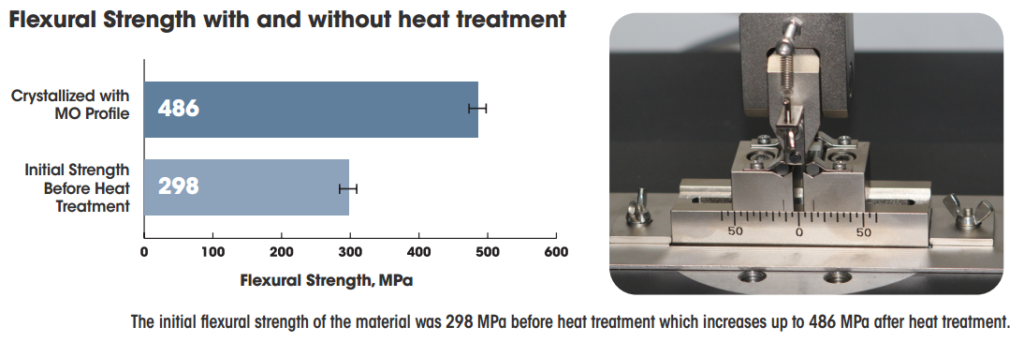
Flexural strength bars (n=10, 14 x 2 x 4 mm) were tested according to ISO 6872:2015 methods. One group was tested after heat treatment according to the MO profile and one group was not heat treated to test the initial strength during milling.
The bars were cut with a slow-speed wafering saw and finished through 600-grit SiC paper before crystallization. Bars were loaded in 3-pt bend with a 12-mm span and 1 mm/min crosshead speed in a Shimadzu AGX-V Universal Test Machine.
Machinability
Chipping of Machined Blank Specimens: Five standardized crowns with a 2-mm occlusal thickness and 1-mm axial thickness with a shoulder margin finish line were milled with each material.
The margin was examined under magnification to detect defects with a minimum size of 0.1 mm and the margin thickness measured with a digital micrometer. The total length (L) of the chipped areas and total perimeter (P) of the crowns were measured and the chipping factor for each crown was calculated (CF = L/P) and presented with means and standard deviations.
The measured thickness of the margin with a calibrated digital micrometer (Mitutoyo Absolute Digimatic) ranged from 1.00 mm to 1.03 mm.

Machining Accuracy
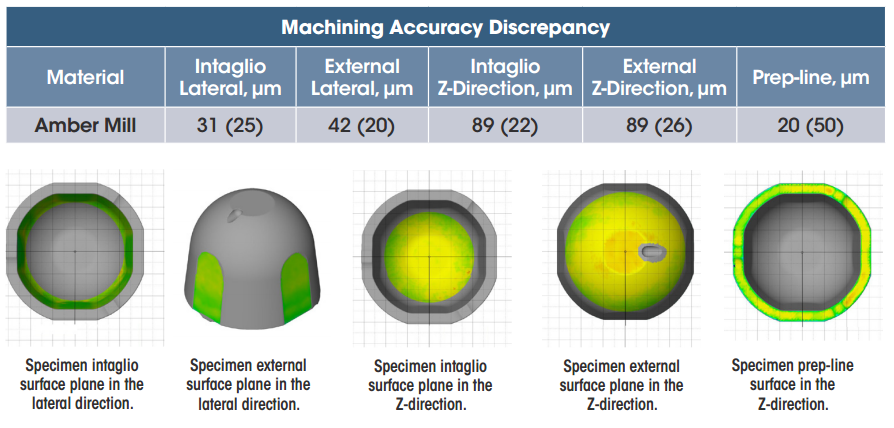
Machining Accuracy (ISO/TR 18845:2017): Standardized crown shape specimens with a 12-mm diameter, 10-mm height, 1-mm wall thickness were milled, scanned with a 3Shape E3 model desktop scanner to 7µm accuracy and analyzed with Geo-Inspect 2018 software according to ISO/TR 18845:2017 methods. Means and standard deviations were calculated of the lateral discrepancy, Z-direction discrepancy and prep-line discrepancy. The results of the milled specimens were scanned and compared to the original design file. The mean value of the machining accuracy gives an idea of how much over/under milling there was as the comparison can give positive or negative numbers. The standard deviations describe the range of values around the mean. In comparison to the results from RR 126 using an inLab MC XL,
the VersaMill 5X400 had similiar or better accuracy for the Intaglio Lateral, and Prep-line areas. There was less variability (smaller standard deviations) in 4/5 areas examined. The Intaglio and External Z-direction both registered higher discrepancies than the other areas, highlighting an aspect that could potentially be improved in the milling control software, or could be compensated during designing the restoration.
